31/07/2012

New project alert!

Apologies for the recent quietness, life is just very busy at the moment and in between finding the time to blog this I’ve also been desperate for a few spare minutes to start my next project!

Since learning to knit about a year ago, I’ve steadily been attempting more complex patterns and after completing quite a few knitted gloves, I finally decided that now was the time to attempt a jumper.

I was imagining a nice cosy winter jumper in cream chunky wool, however the local wool shop didn’t have anything along these lines that didn’t appear to have come straight from the eighties. So, instead I was drawn to this pattern (most likely due to the gorgeous photographs) and it's even made using recycled wool. I love the fifties style and pastel colour, it also looks fairly simple to make so should be a great first jumper, well, cardigan. The only problem is that as it’s a summery style I better get a move on!
Both wool and pattern are from Sirdar and the wool is made from 51% recycled cotton so it’s environmentally friendly too. I can’t wait to get started; does anyone have any tips for starting your first complex project?

20/07/2012

My first vintage find!

I'm not usually particularly talented at thrifting or picking up gorgeous vintage pieces, unlike so many others I know, I just don't have that kind of eye. So you can probably imagine how delighted I was to find this cute cabinet in Otto's vintage store in Exeter.

A quick google revealed the Scott's Roses label (advertising an 1850’s seed company) is known and loved by shabby chic fans the world over; a simple DIY idea would be to print off the label and frame it. The tin plaque, which has been turned into the front of the cabinet, would apparently (according to google) have been the cover of a seed catalogue used by the company.

I instantly knew what to do with it - the rows of hooks inside make the perfect organised bracelet holder and keep things from cluttering the top of my draws. A bit of a bargain for £10!


13/07/2012

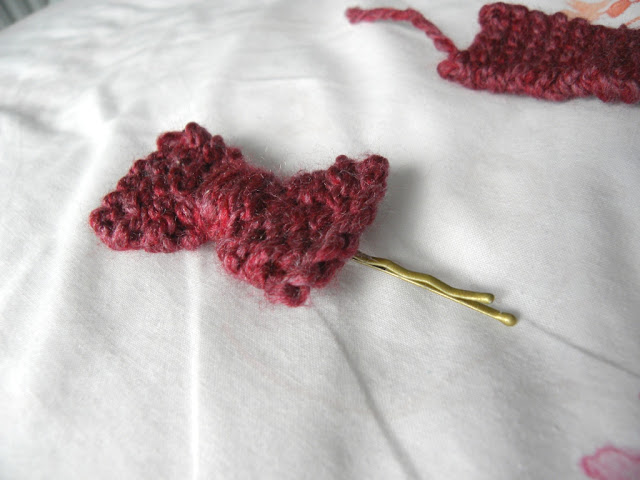
Knitted bow hair clip - a how to

This is quite possibly the easiest and quickest thing I have ever made. It's the perfect 'craft fix' on those days you can't be bothered to get the sewing machine out but need to do something that feels productive (I have a lot of these kind of evenings).

I've seen knitted bows like this in lots of shops and am sure I'll have made many before long, one in every colour perhaps.


To make a pretty bow hairclip, cast on 6 stitches and knit 17 rows, (I'm not sure why I did 17 exactly, it just looked a good length) then cast off. Take a length of wool and wrap around the centre to make a bow shape, secure with a double knot at the back. Then find a hair slide and thread the wrapped wool through the centre of the slide.... easy peasy AND super cute.


It's a great way to use up spare bits of wool and as they're really light once made I think I'll be posting them in female friends birthday cards for the foreseeable future, and making more for myself. Obviously.

10/07/2012

Dotty about nail art

Recently I've found myself unable to have plain painted nails - they've got to be a bit different, maybe because I haven't been shopping in so long that I'm desperate for something to make an outfit look new! Either way, I've been trying out a few nail art designs and stumbled across this one, which is great for when you don't have much time to devote to anything too tricky.

All you need is two nail polish colours and a hair clip. I'm sure you can see what I'm about to say, but simply paint your nails as usual then use the tip of the hair clip to dot nail polish onto an accent nail (or all if you have time!) and finish with a clear coat to prevent chips.


Nail polish - Stay Perfect by No 7, highland mist as dots and so simple as basecoat

To get a good dot the hair clip is much easier to use than the nail polish brush, as it's the perfect shape and you can't overload it with too much polish.

I went for neutral colours for work, but think rainbow colours or pastels would also look great, as would a classic navy with white polka dots - I think I might try that next!

04/07/2012

Handmade notebook cover - a how to

This handmade notebook cover has been on my ‘to do’ list for about five years, in fact probably even longer than that. It was actually a kit I brought at a craft fair (the pretty colour of the fabric sold it to me) but when I got home it went straight into my craft box and I promptly forgot about. Last month I finally had the chance to get started and with all the celebrations this summer, I simply had to incorporate bunting into my design.

The kit included brief instructions, a notebook, fabric, embroidery thread and pink beads. It also included a needle but after several years stuck in its plastic it had gone a bit rusty!

To make your own embroidered notebook, simply cut a rectangle of fabric slightly bigger than your open notebook. Leave a 1.5cm allowance along the top and about 4cms allowance each end.
Mark out your design and then embroider using threads, beads, sequins... anything you like.
Then cut a second piece of fabric the same size to act as a lining, place front sides together and sew around leaving a 1.5cm seam allowance on all seams and leaving a small gap one so you can turn it the right way out.
Turn the right way out and press flat. Fold fabric around notebook. Pin the extra allowance on each side around the covers of the book (remembering that it needs to fit when you close the book, not just when it’s open) then blanket stitch along top and bottom edges to secure cover around notebook.


I love it and it would make a great personalised present - I’m keeping this one for myself, but am planning on making some more for friends’ birthdays.

LinkWithin

Related Posts Plugin for WordPress, Blogger...